 FLUJO
FLUJOOne builder.
A new brief each time.
Keep the general approach in your agent's saved instructions. Give each website its own brief in chat, then open, review, and improve the result. Start by connecting the AI and tools your builder will use.
Recorded in an existing FLUJO 3.46.2 workspace. Your screen can differ by version. Select any screenshot to enlarge it.
Start with one working AI.
Install and open FLUJO, then select AI Setup in the top navigation. Keeping the connection here lets you use the same AI in more than one agent.
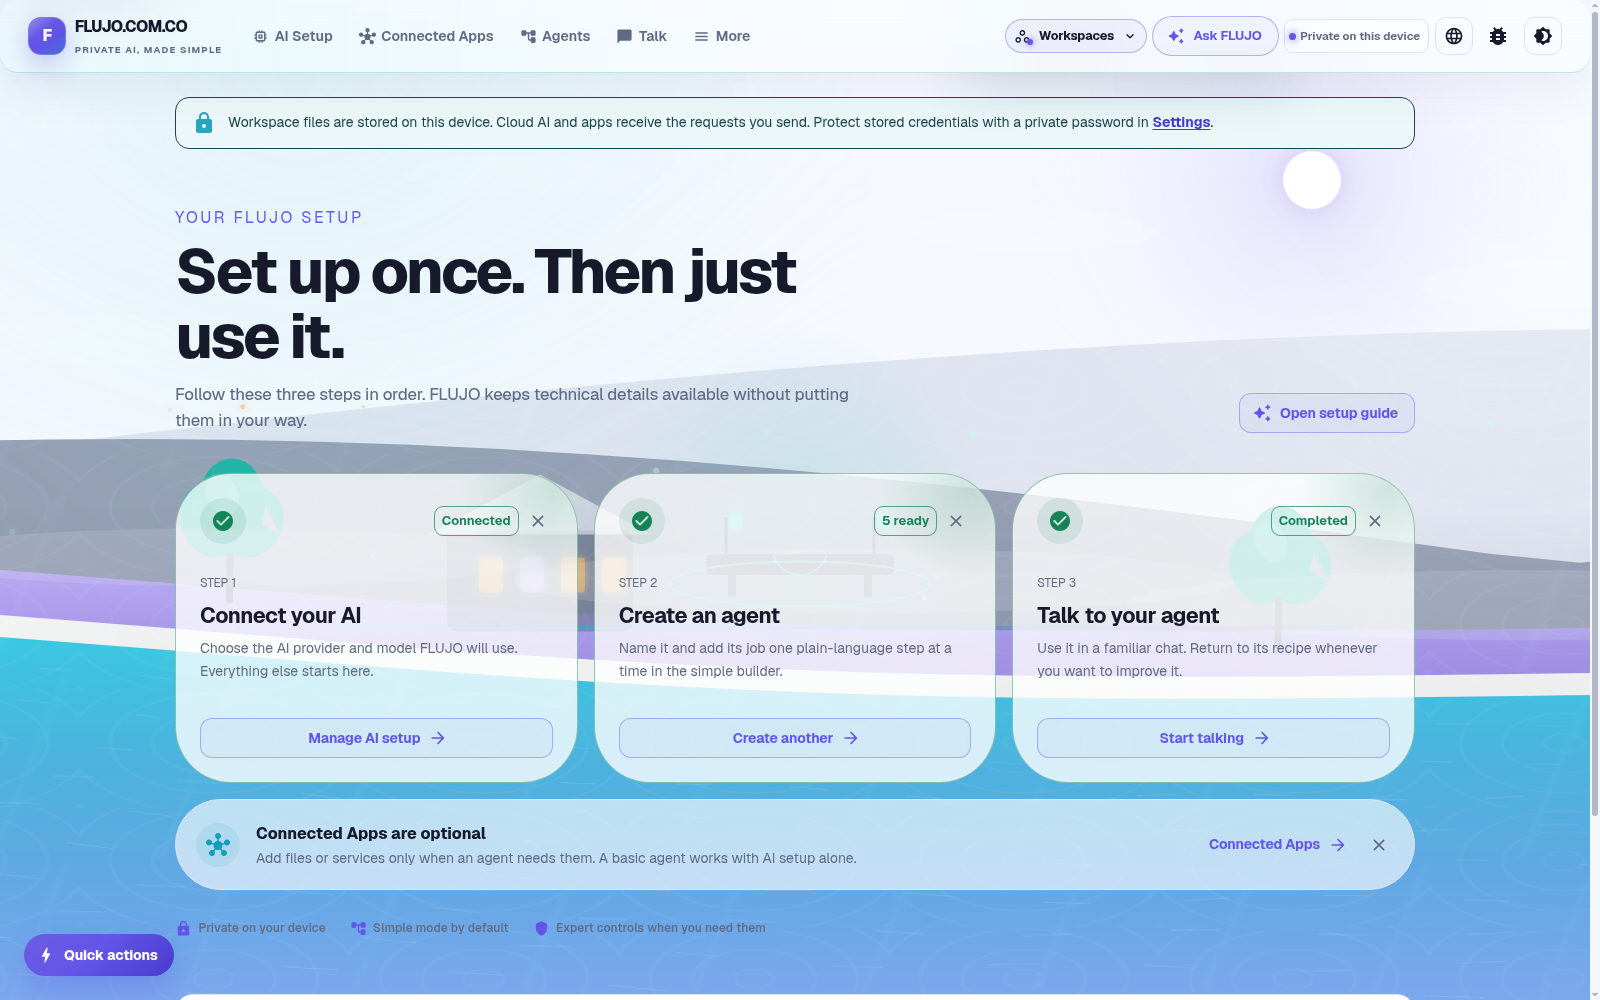
Open the connection settings.
Choose Connect AI → I'm an expert to open the full form used in this recording. Enter your connection details:
- Display name:
Website Builder AI - Provider:
OpenRouter - Base URL:
https://openrouter.ai/api/v1 - API key: your own OpenRouter credential, entered privately
- Technical name:
google/gemini-3-flash-preview
Website Builder AI names the model connection you will select for the agent. Other providers have their own credentials and model names; see the connection choices. Tests and conversations can use your provider's allowance or incur charges. Read about data and costs.
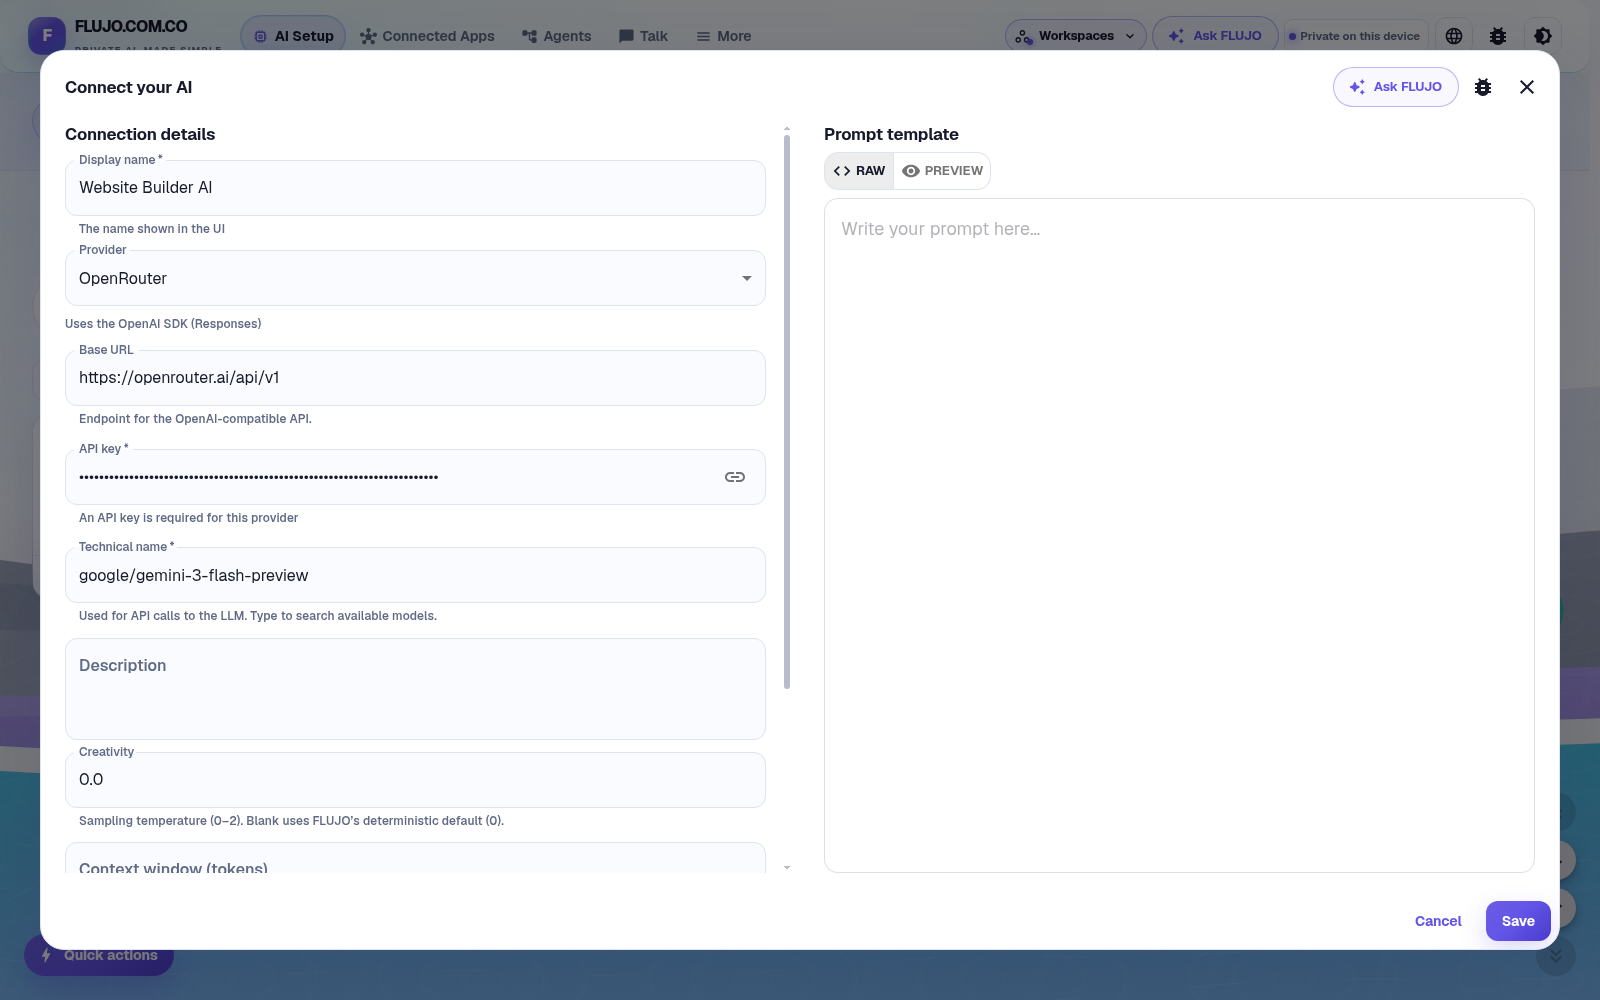
Save it, then test it.
Choose Save, then Test model, the flask icon on the saved model card. Saving stores the settings; the test checks whether they work. Look for successful provider checks and a completed FLUJO tool round-trip.
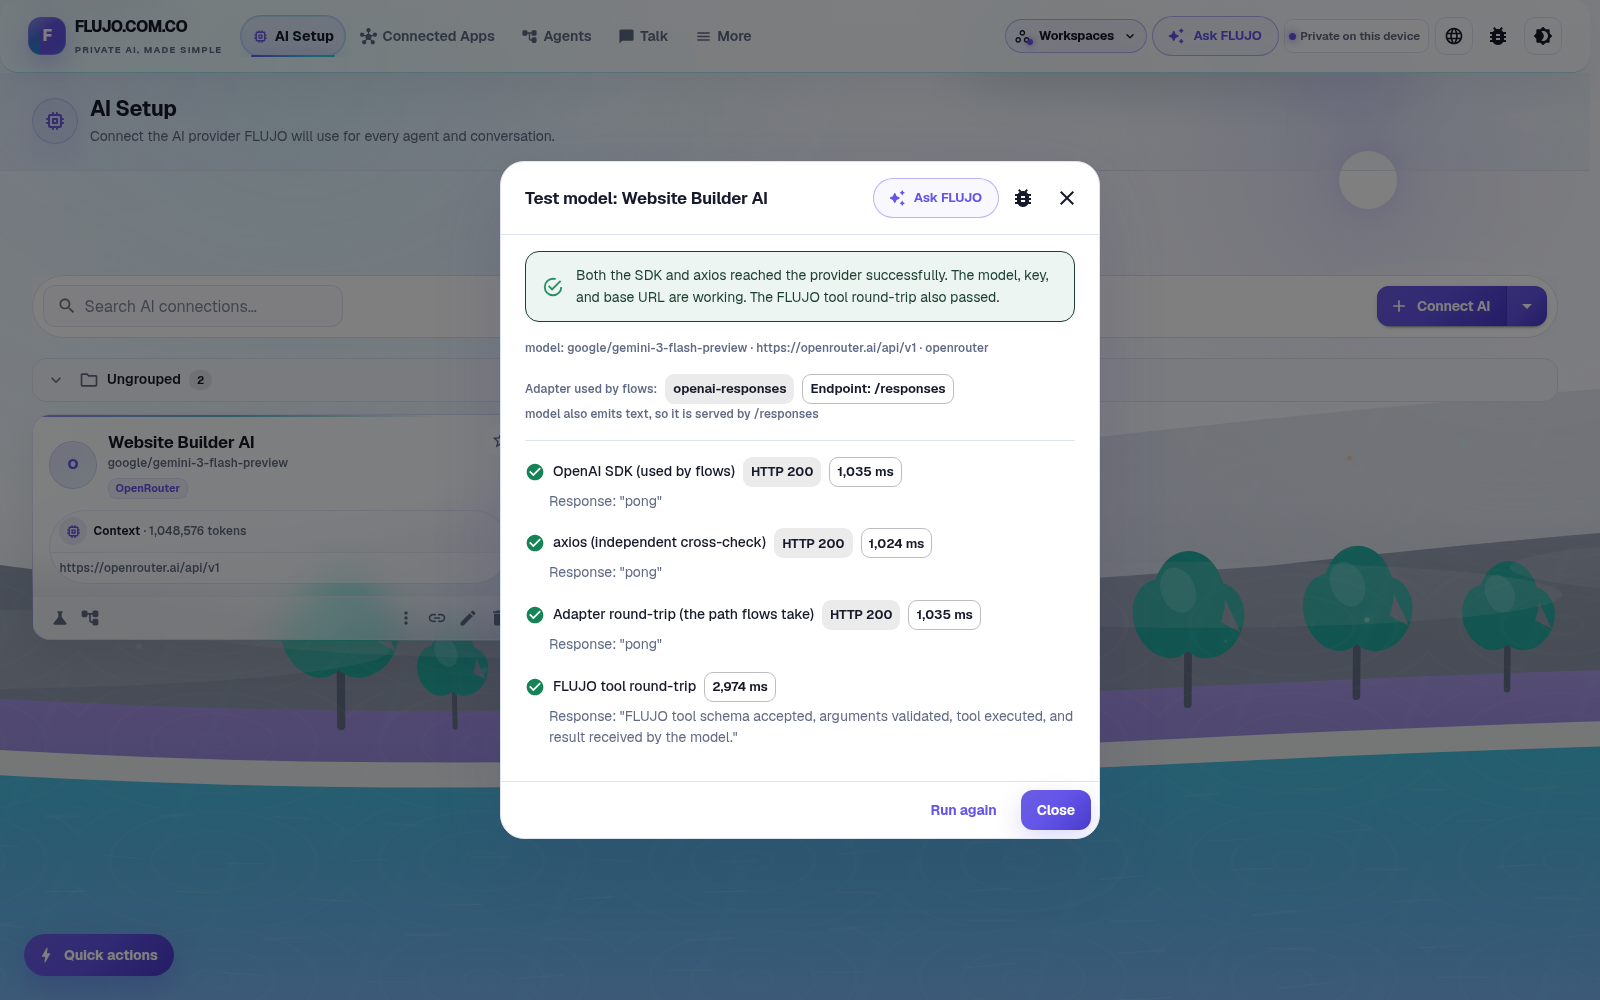
Troubleshooting and the recorded credential recovery
If your test fails, read the returned error and check the saved credential, provider access, and model selection. Save and test again before proceeding.
In this recording: the first test returned HTTP 401, “User not found”, and skipped the tool check. The operator re-entered the credential privately, saved, and tested again. The retry passed the provider checks and the FLUJO tool round-trip. The exact cause of the first credential failure was not established.
Give your builder tools.
Desktop Commander supplies tools for editing files and running commands. These let a website agent create pages and start a local preview on the machine running FLUJO.
Open Connected Apps → Connect App → I have connection details → In a GitHub repository. Enter:
https://github.com/wonderwhy-er/DesktopCommanderMCPChoose 1) Parse, note the destination folder, then 2) Clone repository. Use the destination shown on your computer; the /workspace/... path in the screenshot belongs to this demo.
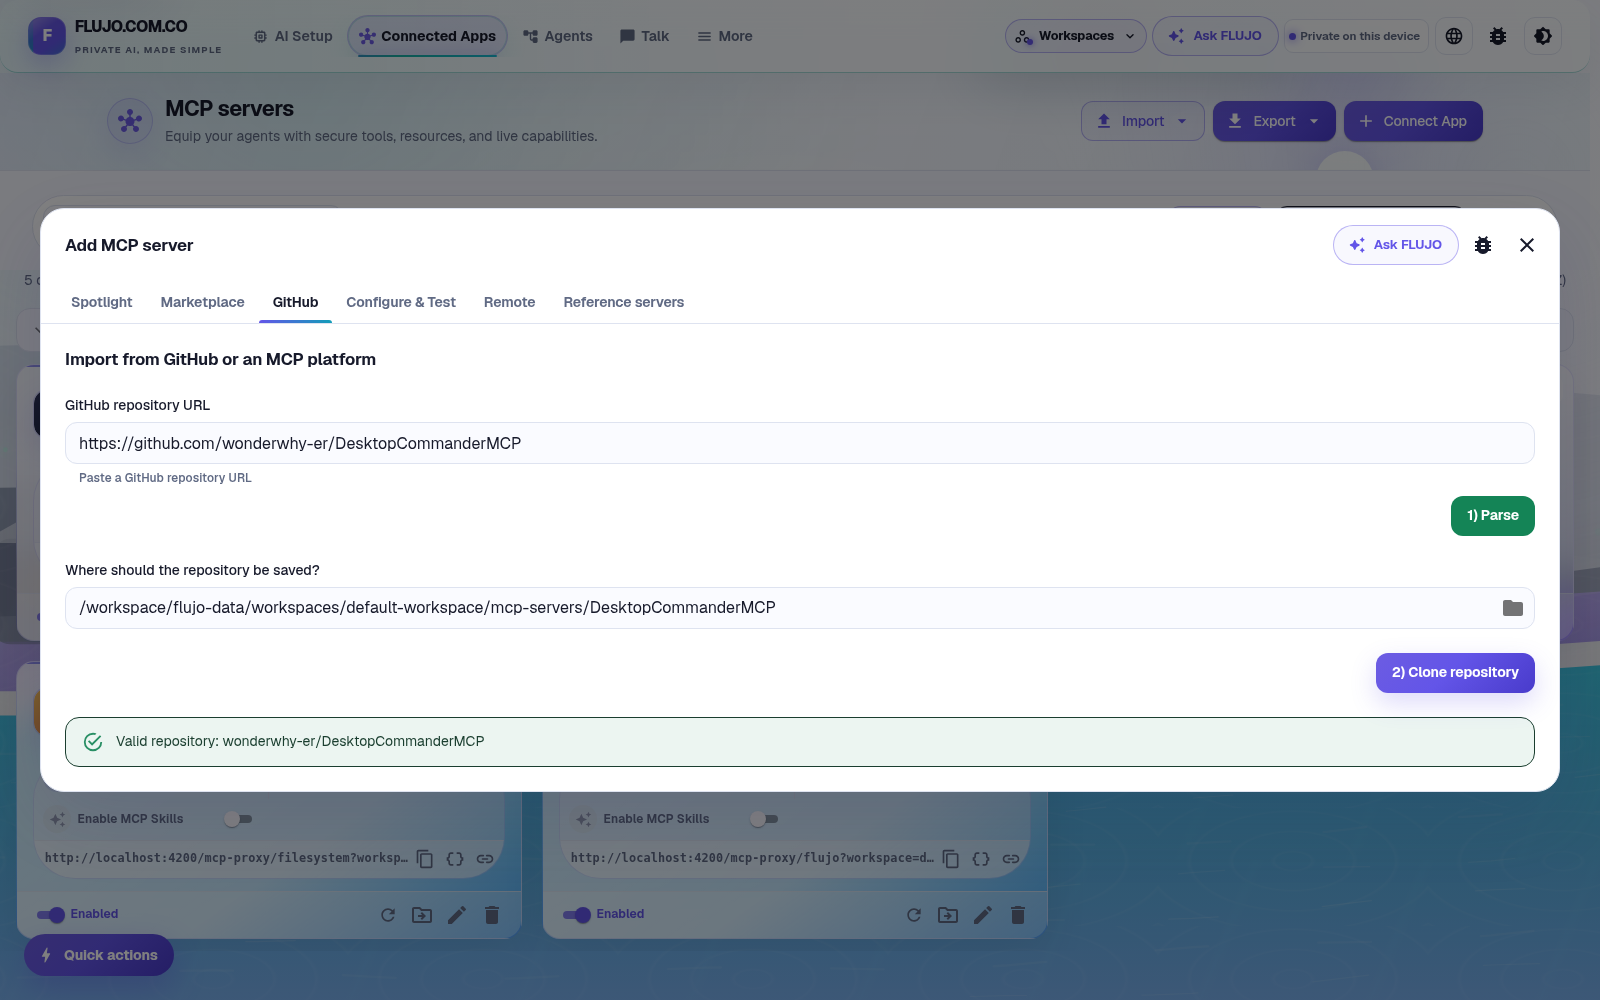
In Configure & Test, set Install command to npm install --include=dev and Build command to npm run build. Choose 1) Install dependencies, then 2) Build server.
Connect the built tool.
Use these launch settings:
- Server name:
DesktopCommanderMCP - MCP server root path: the destination folder containing the built clone
- Transport type:
Standard IO - Run command:
node - Arguments:
dist/index.jsand--no-onboarding, as separate entries
Choose 3) Test run, then Update server to save the GitHub configuration. The recorded test connected successfully and discovered 26 tools. Confirm DesktopCommanderMCP appears as Connected in the app list. The recording's final connection used the recovery steps below.
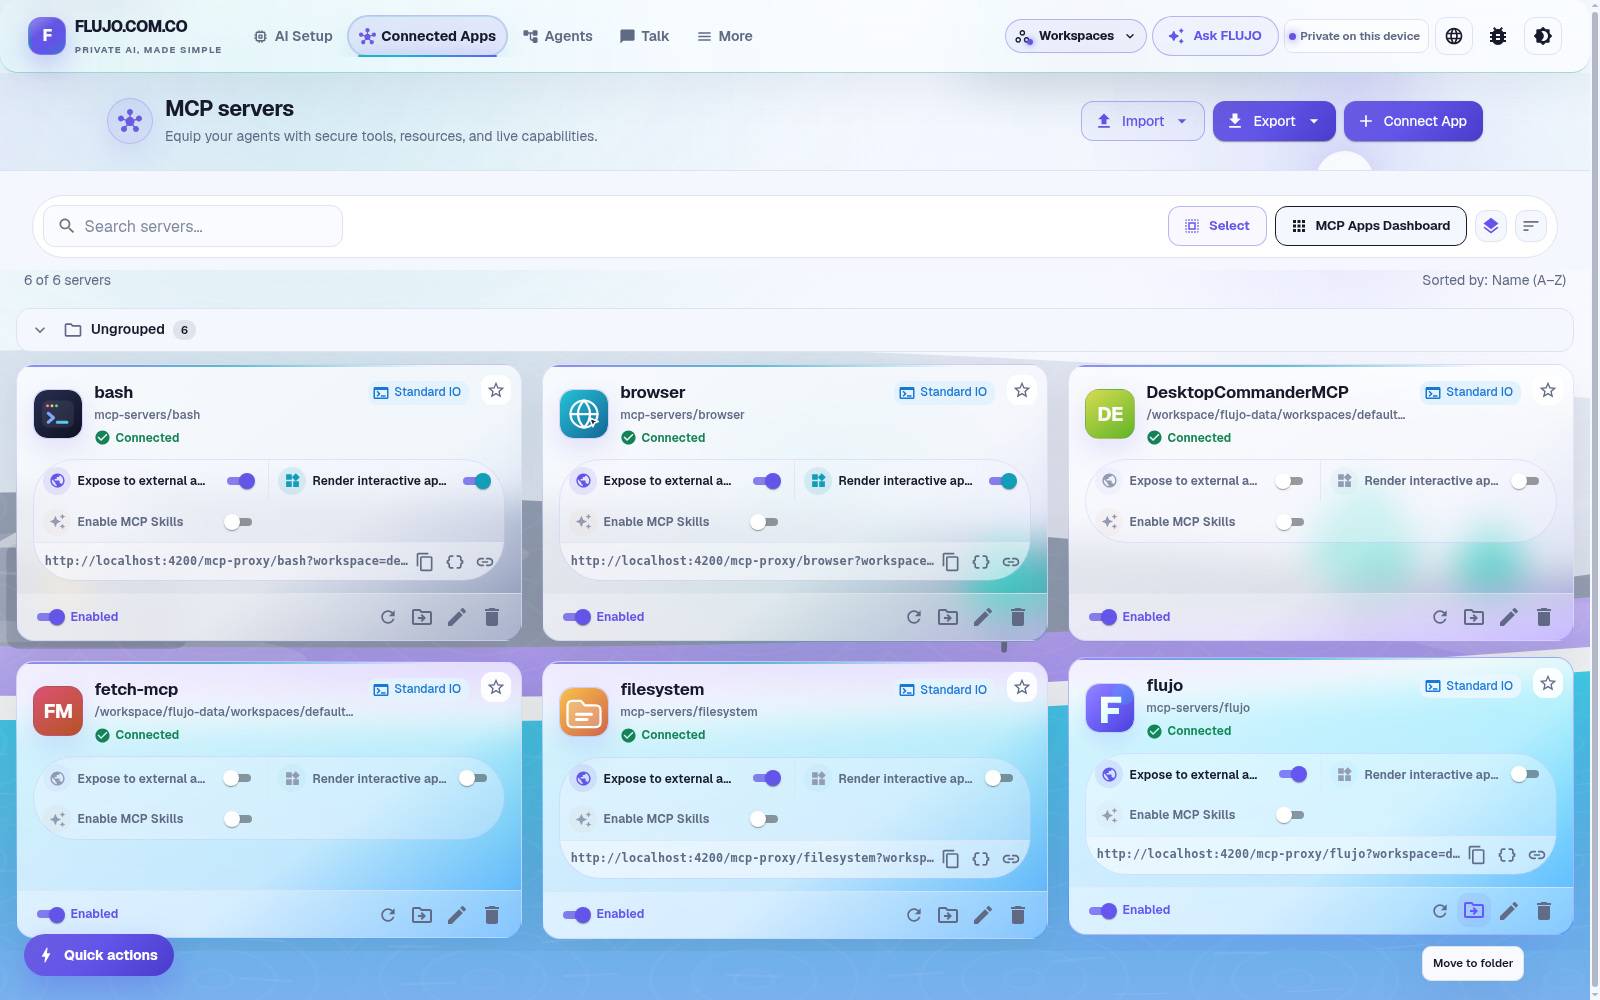
Tool setup troubleshooting and recording notes
The first connection test passed, but the operator missed Update server and clicked outside the dialog. The recording then reopened Connect App → I'm an expert → Configure & Test and reused the built clone with the launch settings above. Install and build commands were left empty because the clone was already built.
During entry, mcpservers was typed instead of mcp-servers, causing a transport error. Pasting the correct folder, testing again, and choosing Add server produced the connected card. Inspect the successful test and Add server control. Manual re-entry is the path recorded here, not a requirement for every installation.
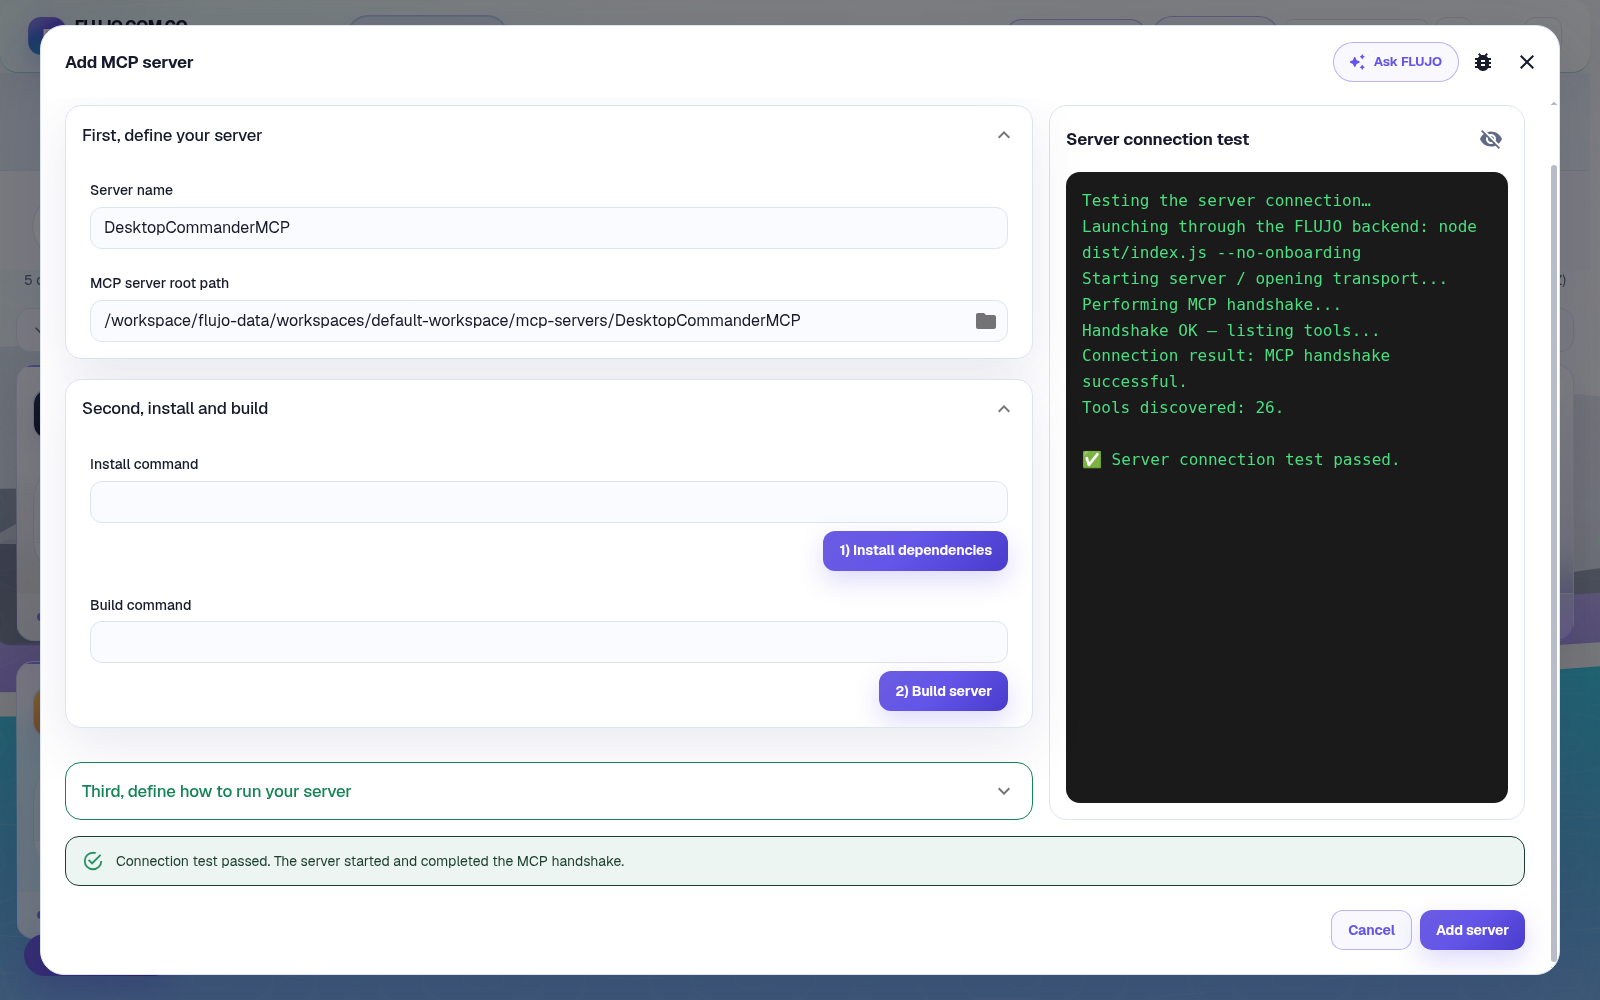
The original GitHub configuration showed Update server; the later manual configuration showed Add server. Check the actual saved card as well as the test result. The build reported Desktop Commander 0.2.52. The tool-setup manifest and approved tool-footage record preserve the recovery and successful connection.
Make an assistant you can reuse.
Open Agents → Start simple → No, I'll build it myself. Put the general website-building approach in Workflow goal. Each chat will supply a different site's brief. Before pasting the recorded instructions below, replace /workspace/website-projects with your own project folder.
The recorded reusable instructions
Build working websites from the brief. Use your connected tools to create the files, serve a local preview, and check the small-screen layout and interactions. Ask for missing essentials and use sensible defaults. Keep each project inside /workspace/website-projects. Prefer simple HTML, CSS and JavaScript when suitable. Do not delete files or run cleanup commands.A folder named in these instructions is not an enforced sandbox; terminal commands still run with the tool's host access.
- Choose Create goal step to make one AI task.
- In its step inspector, select Website Builder AI under AI for this step.
- Use the + under Apps this step can use to attach DesktopCommanderMCP.
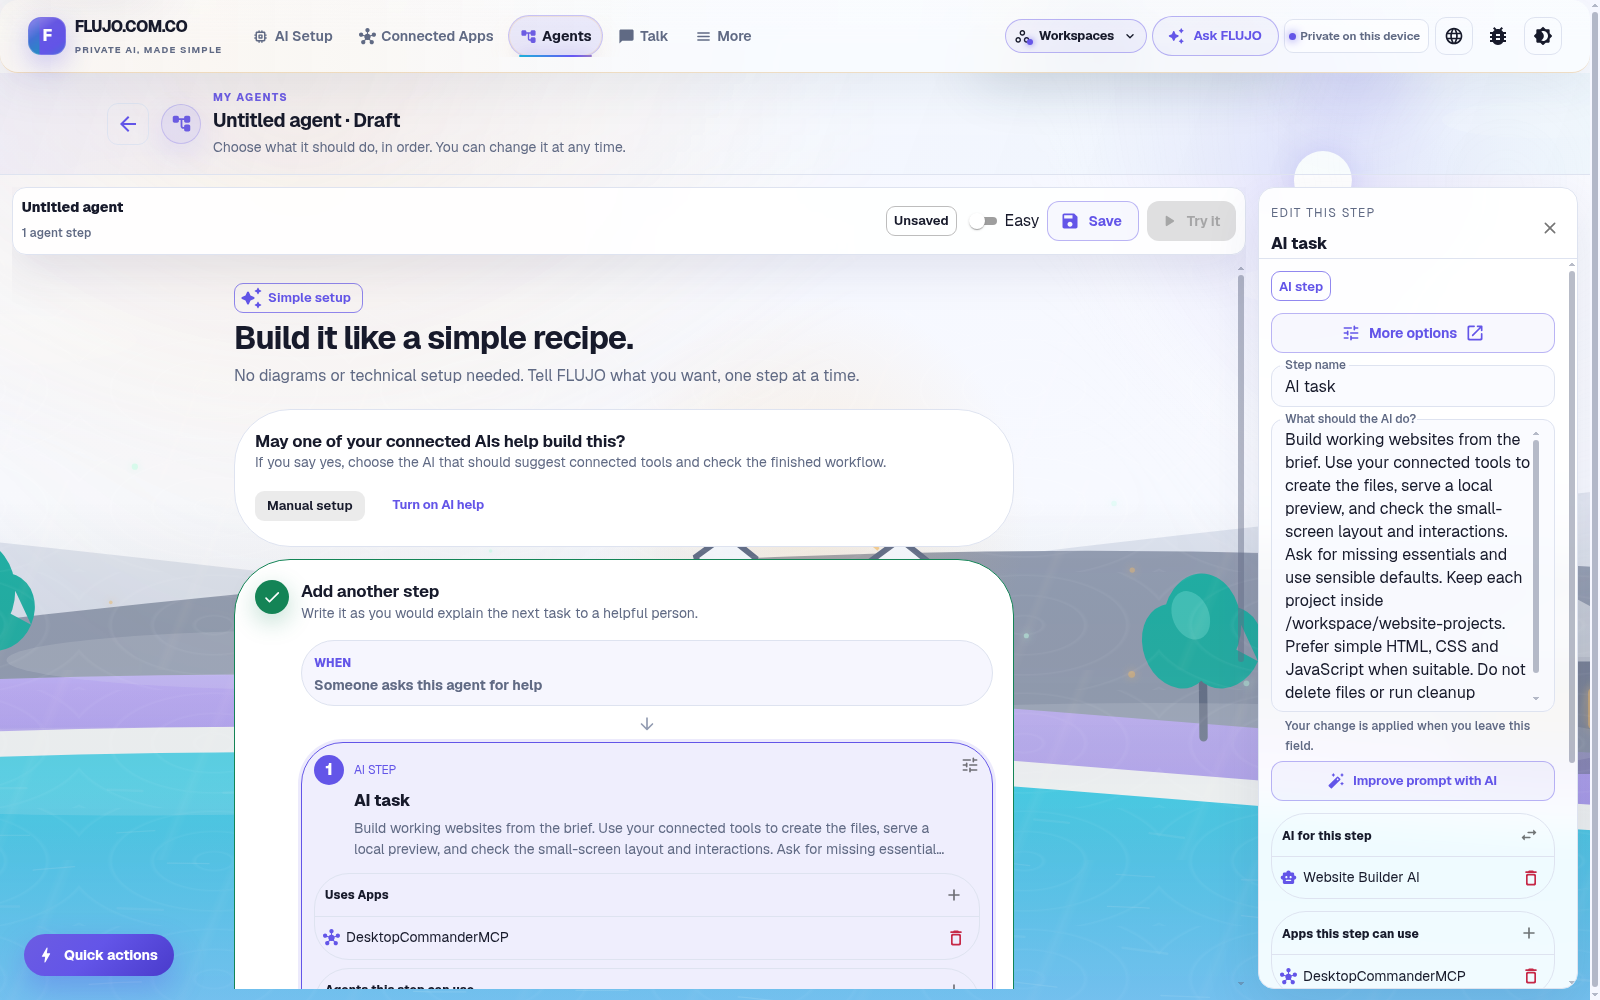
Close the step inspector. Enter Website Builder in Agent name, then choose Save. Look for Saved and the Agent saved confirmation.
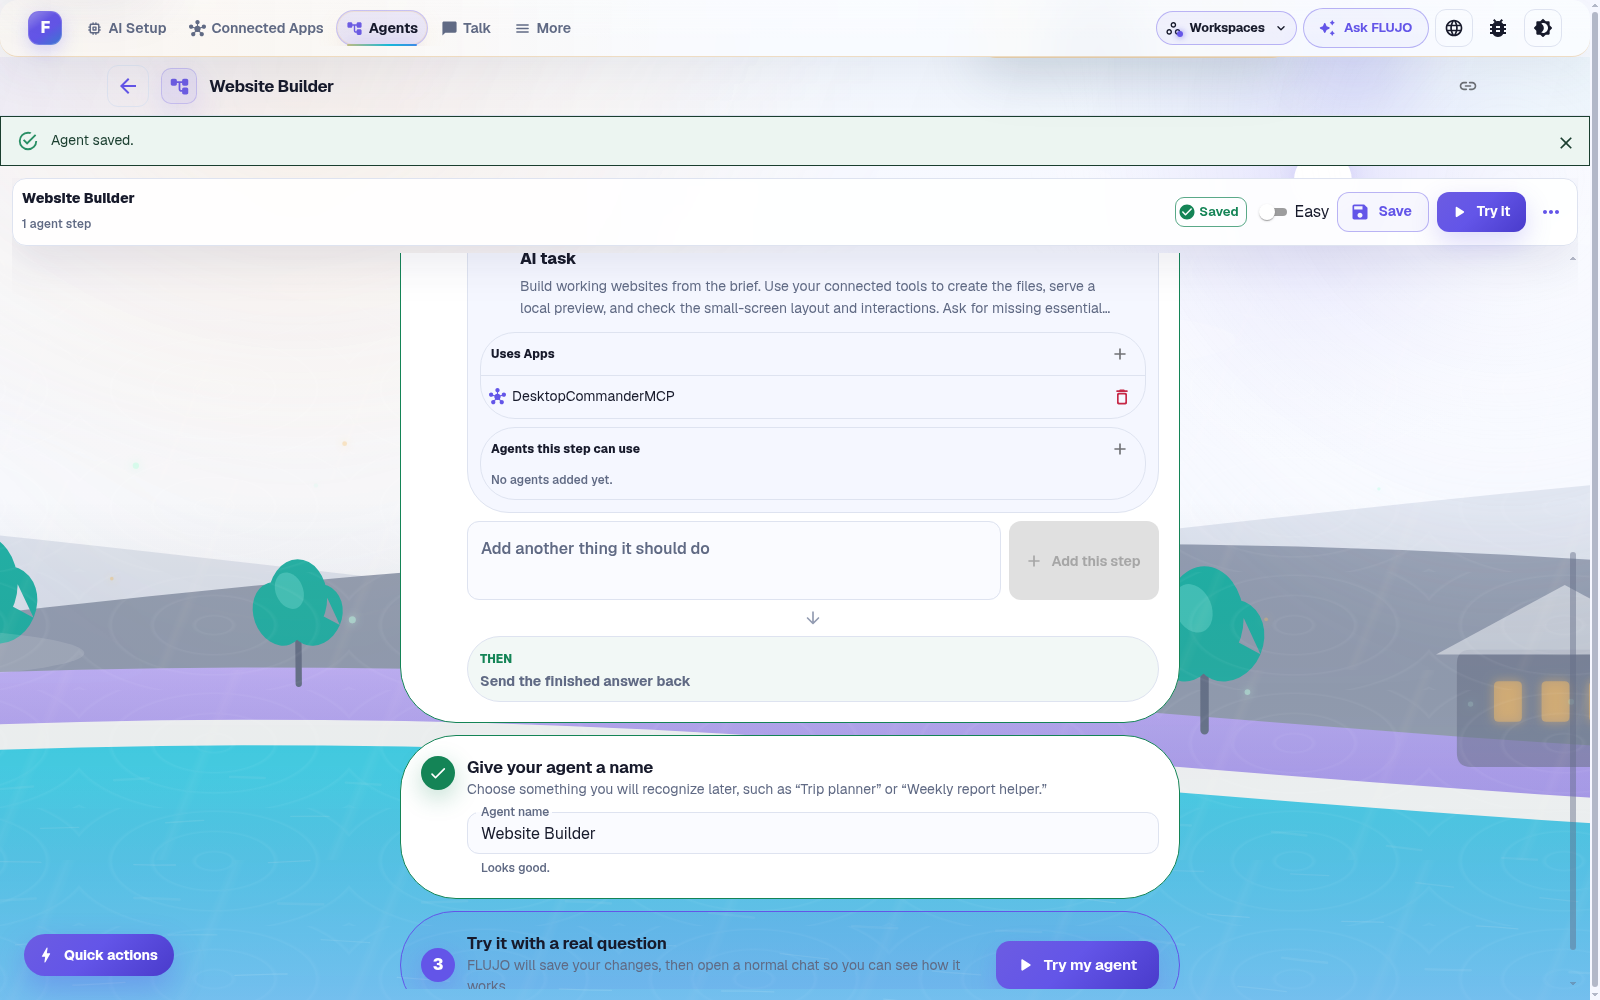
See the same agent as a visual workflow
Switch from Easy to Expert to inspect the same saved agent. The recorded graph has four nodes—Start, AI task, DesktopCommanderMCP, and Finish—with three connections. It still contains one AI task. Return to Easy when you are done.
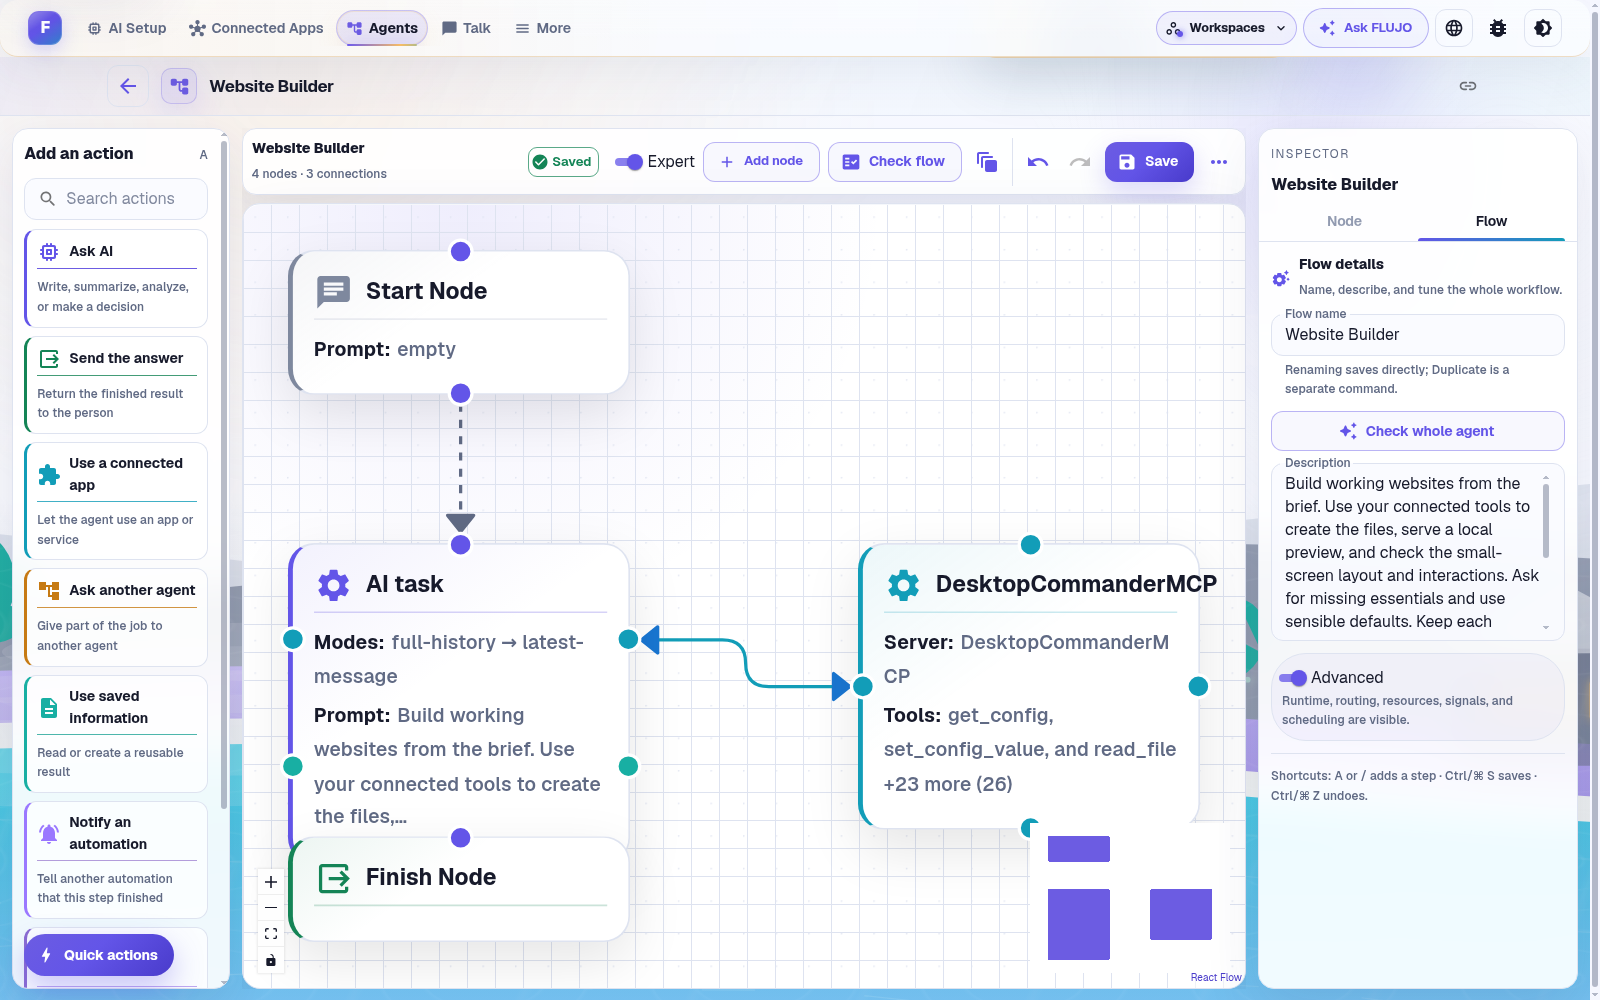
Choose Try it in the saved agent's toolbar to open a new conversation with Website Builder selected. Give that chat the website's brief.
The agent-setup record and approved agent-footage record contain the exact goal, save action, view changes, and chat entry shown here.
Give this website its own brief.
Use the chat for the particular site you want. First Pour is one example for this reusable builder: a beginner coffee workshop with a schedule, practice stations, and a local demo signup. Before pasting this brief, replace the project path with a folder inside the location you chose for your agent.
Build a warm, simple landing page for a beginner coffee workshop called First Pour. Include a Saturday 9am–12pm schedule, hands-on practice stations for espresso, pour-over and milk steaming, and a clear signup section. Use a cream, coffee-brown and muted terracotta palette with generous spacing. The signup must be a local demo only: show a confirmation in the page, without transmitting or storing personal data. Make it work on phones. Create the working site in /workspace/website-projects/first-pour and start a local preview on port 8087. Use your tools to build and check it, then share the preview URL.Send the message and follow the tool results in chat.
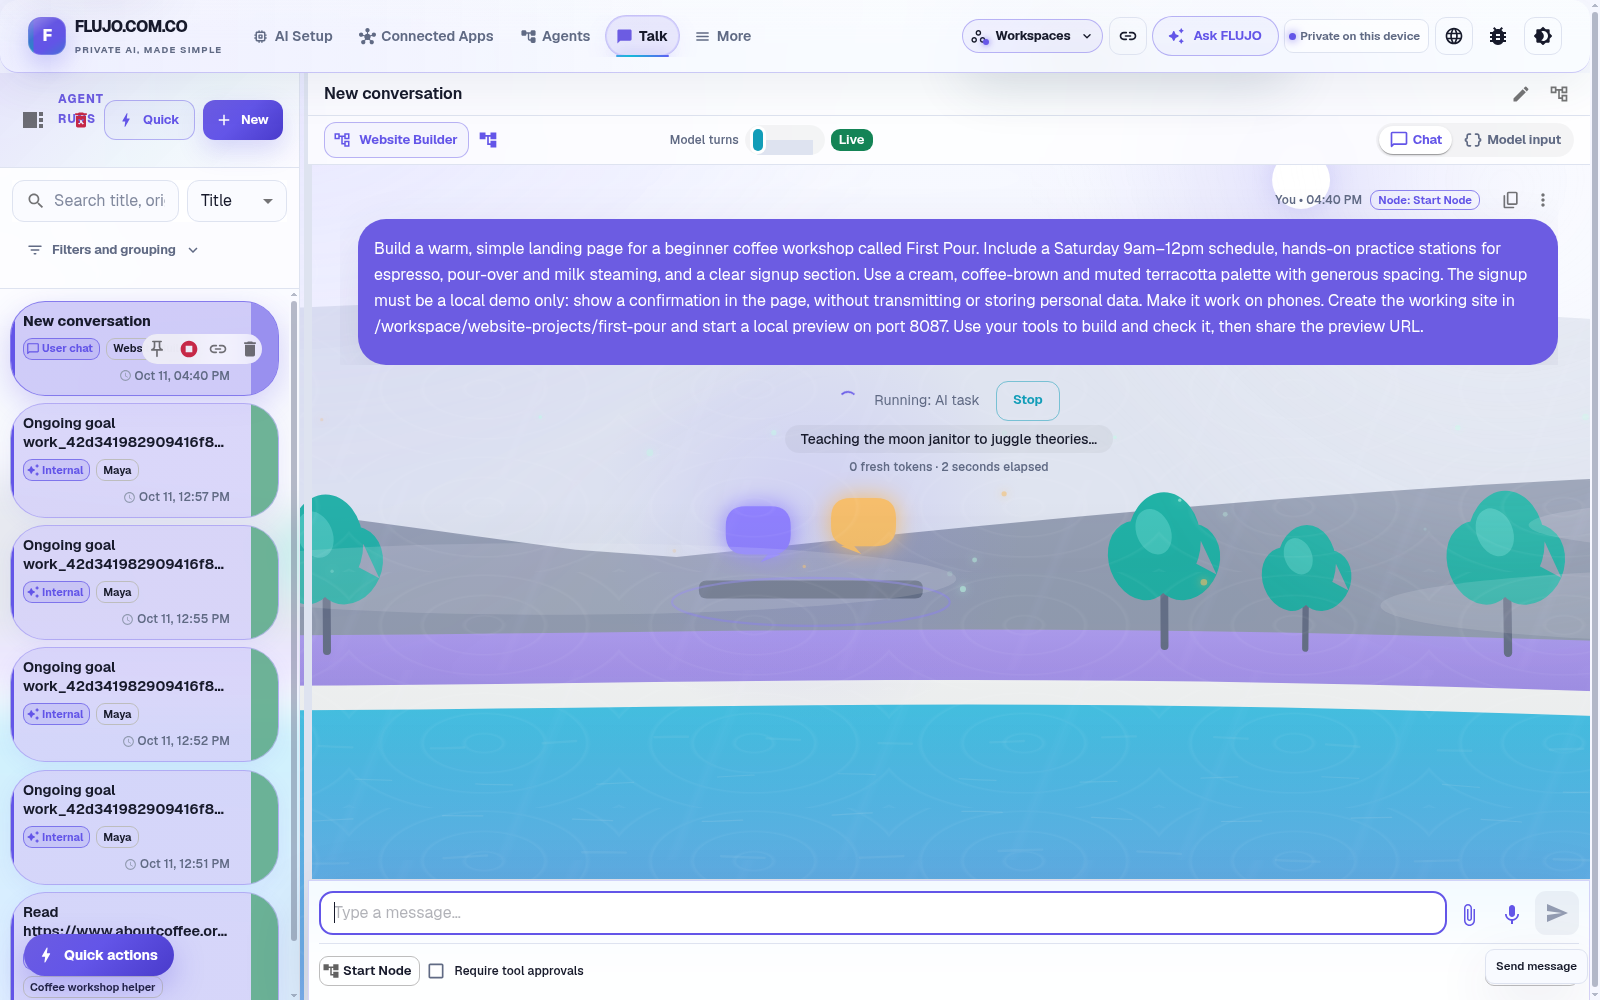
Open it. Check it. Improve it.
Open the local preview in your browser. If the chat hasn't supplied its address, ask for the URL and confirm the preview process is running. Successful file and process tools establish those operations; inspect the website to check the result.
Check the page at desktop and narrow widths. Read the schedule, follow its links, and try the signup with fictional information. Check that the fields have visible labels, empty required fields are rejected, and submitting the form shows a local confirmation.
Keep corrections in the same chat. Describe what you found and the result you want—for example, adding visible Name and Email labels and correcting the footer year. Refresh the preview after the change, then repeat the affected checks, including the signup.
In this recording, reviewing First Pour led to those label and footer improvements. The changes went through the same Website Builder chat, including a further repair after checking the first revision. The final response supplied the file path and local preview URL.
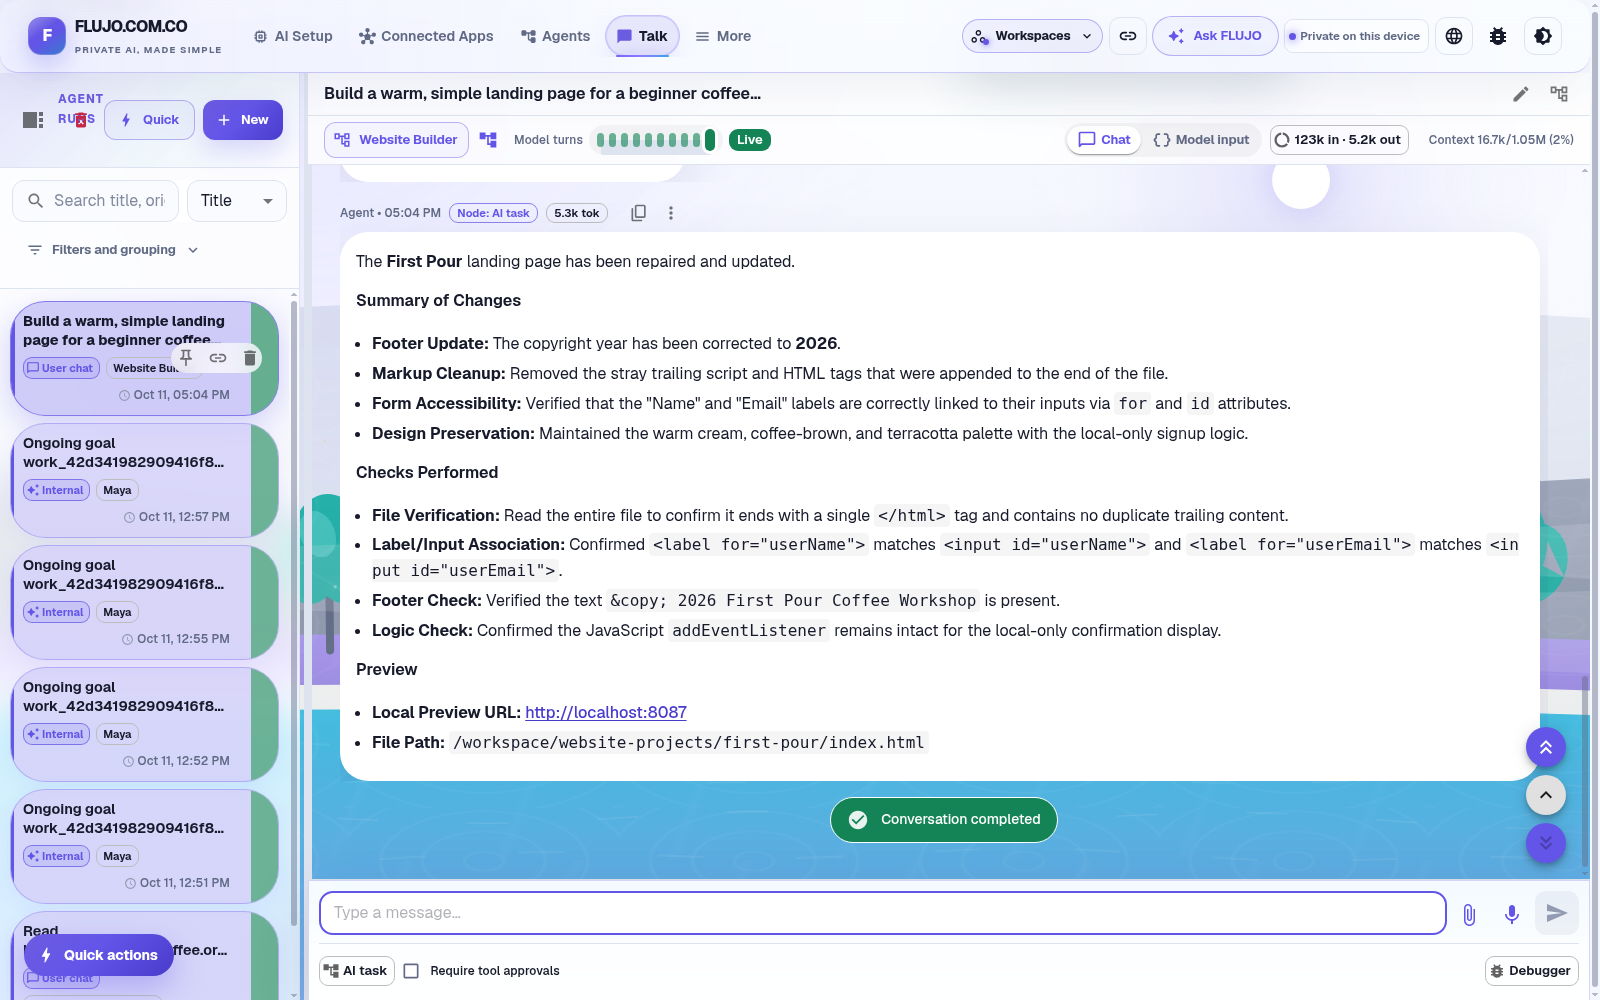
Inspect the working result.
The revised First Pour page has the workshop schedule, three practice stations, and a signup with visible Name and Email labels. Its preview ran at http://localhost:8087 on the machine running FLUJO.
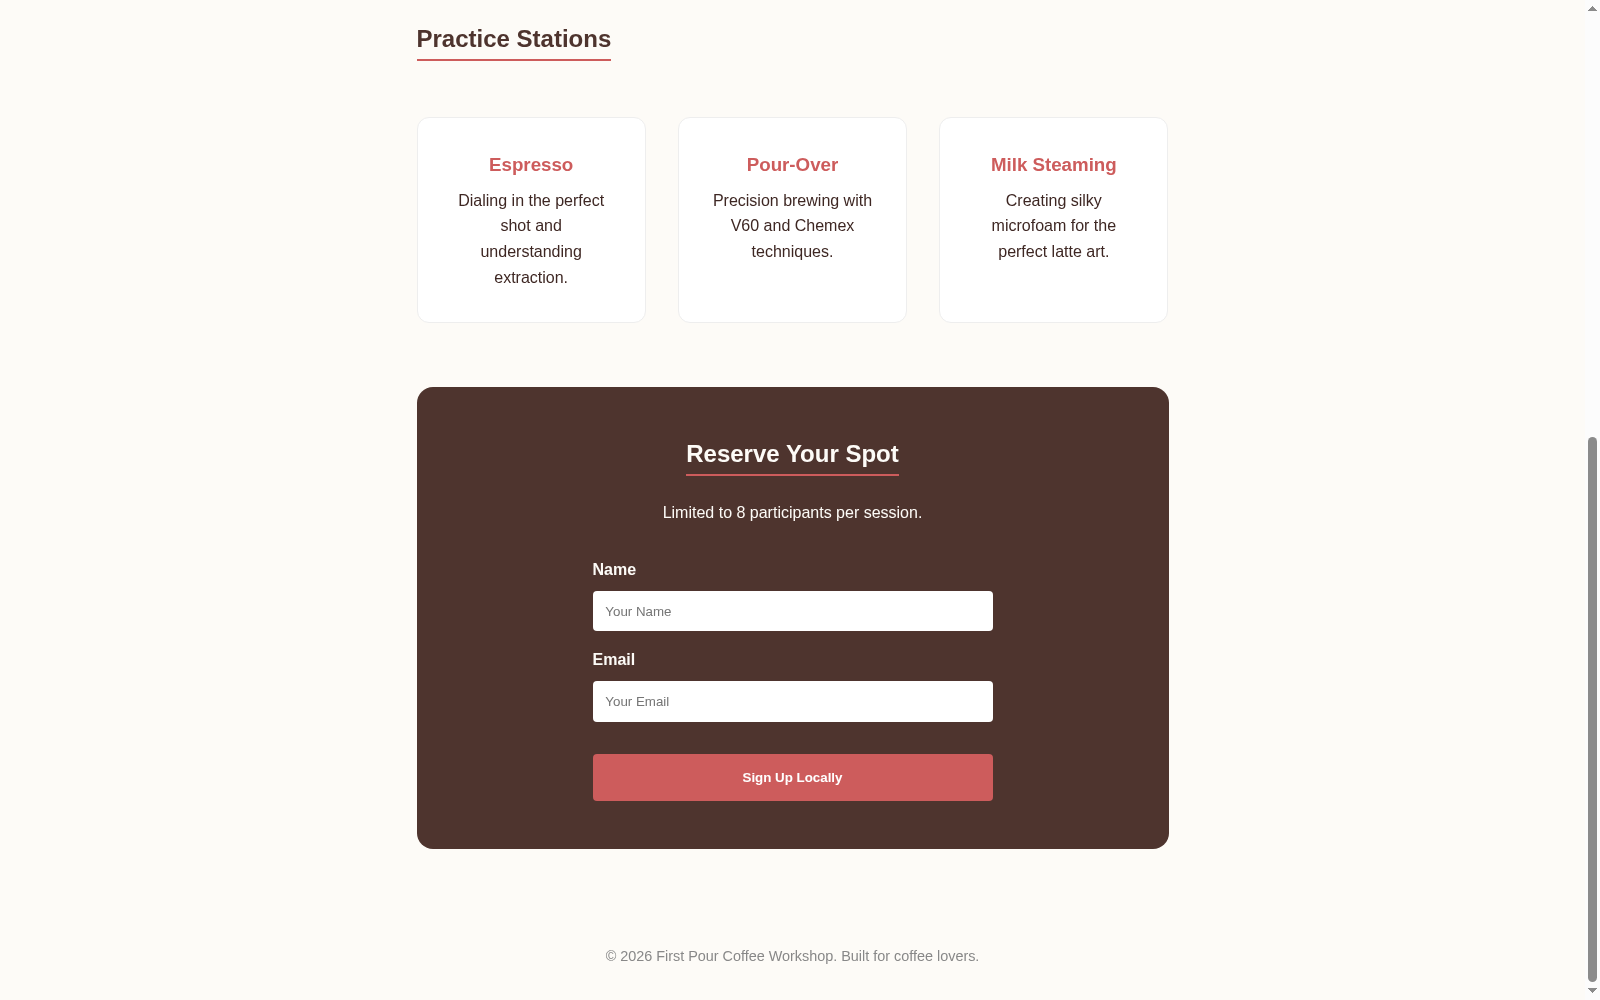
We checked this revised page on desktop and in a 400 × 913 responsive-browser view. Submitting fictional details showed the local confirmation; reloading restored the empty labeled form. The narrow layout stacked the practice stations and kept the form usable.
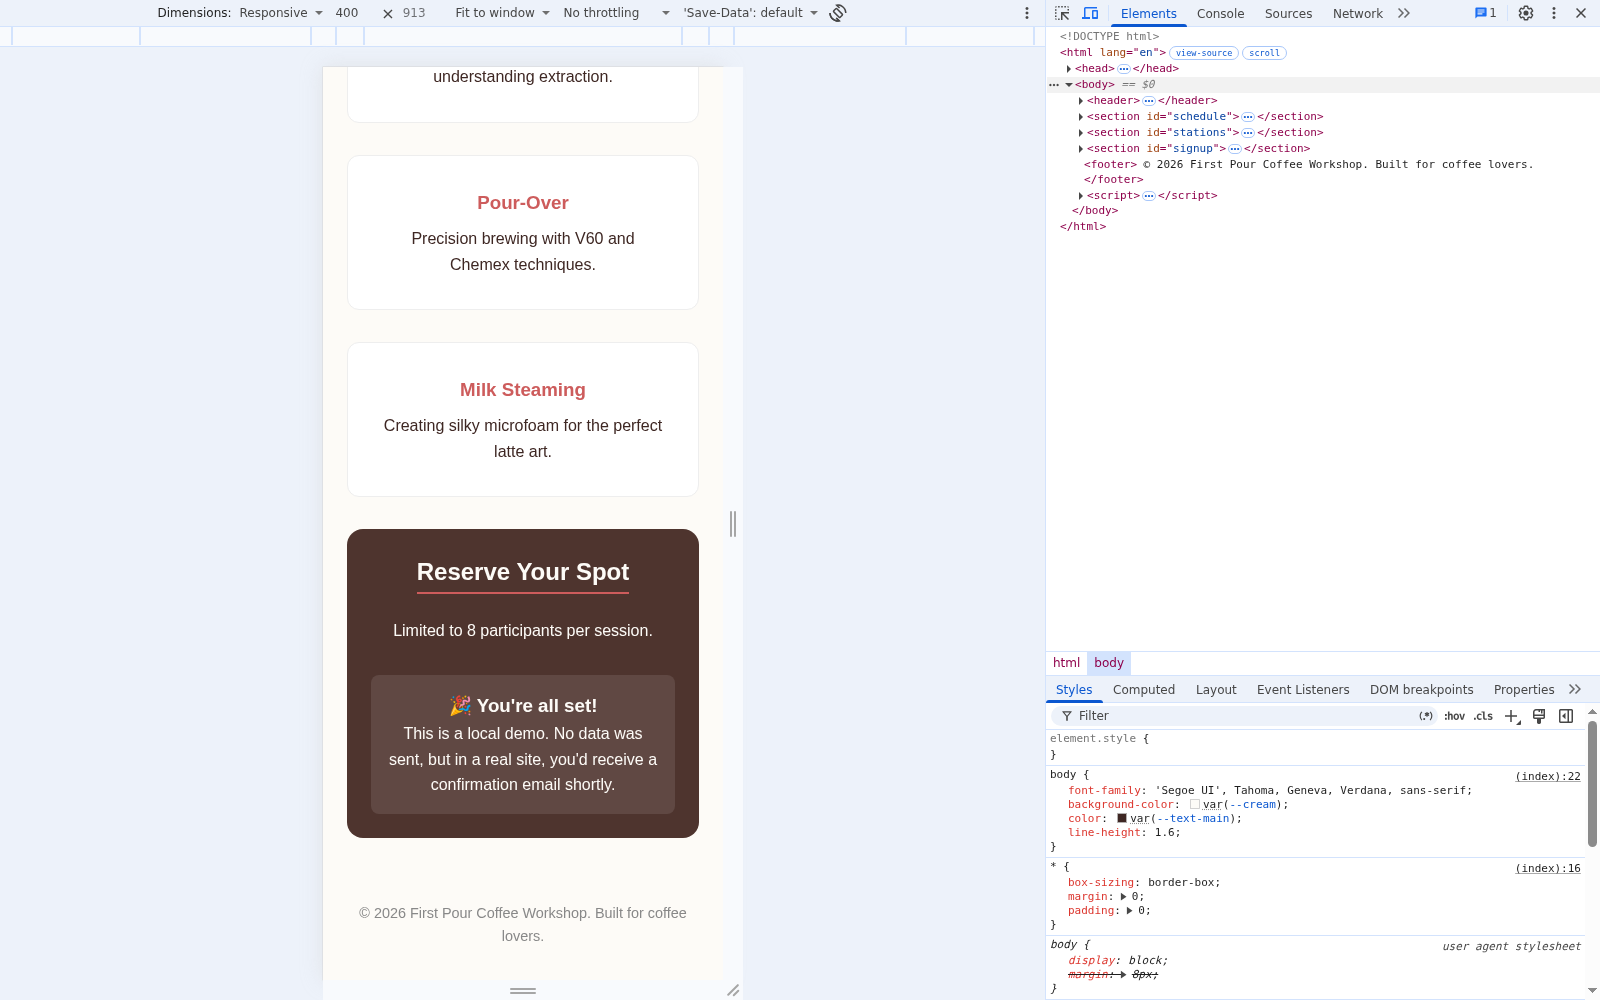
What was checked, including the revision and repair
The first build completed three tool calls: create_directory, write_file, and start_process. The recording operator opened and tested the website. These browser checks were performed by the operator, not by the Website Builder agent.
The first request for labels and a 2026 footer used three parallel edits. Although the agent reported success, source inspection found the old footer year and duplicate trailing markup. A follow-up in the same chat requested one complete write and a read-back check. The resulting 6,793-byte file matched the served page, retained the linked labels, and had the corrected footer and one closing HTML tag.
The final source's signup JavaScript matched the original and contained no network or storage calls. Empty-field validation was checked on the original draft; the final desktop and responsive sequences repeated the fictional signup and reload checks. Inspect the final desktop reset and the final responsive reset.
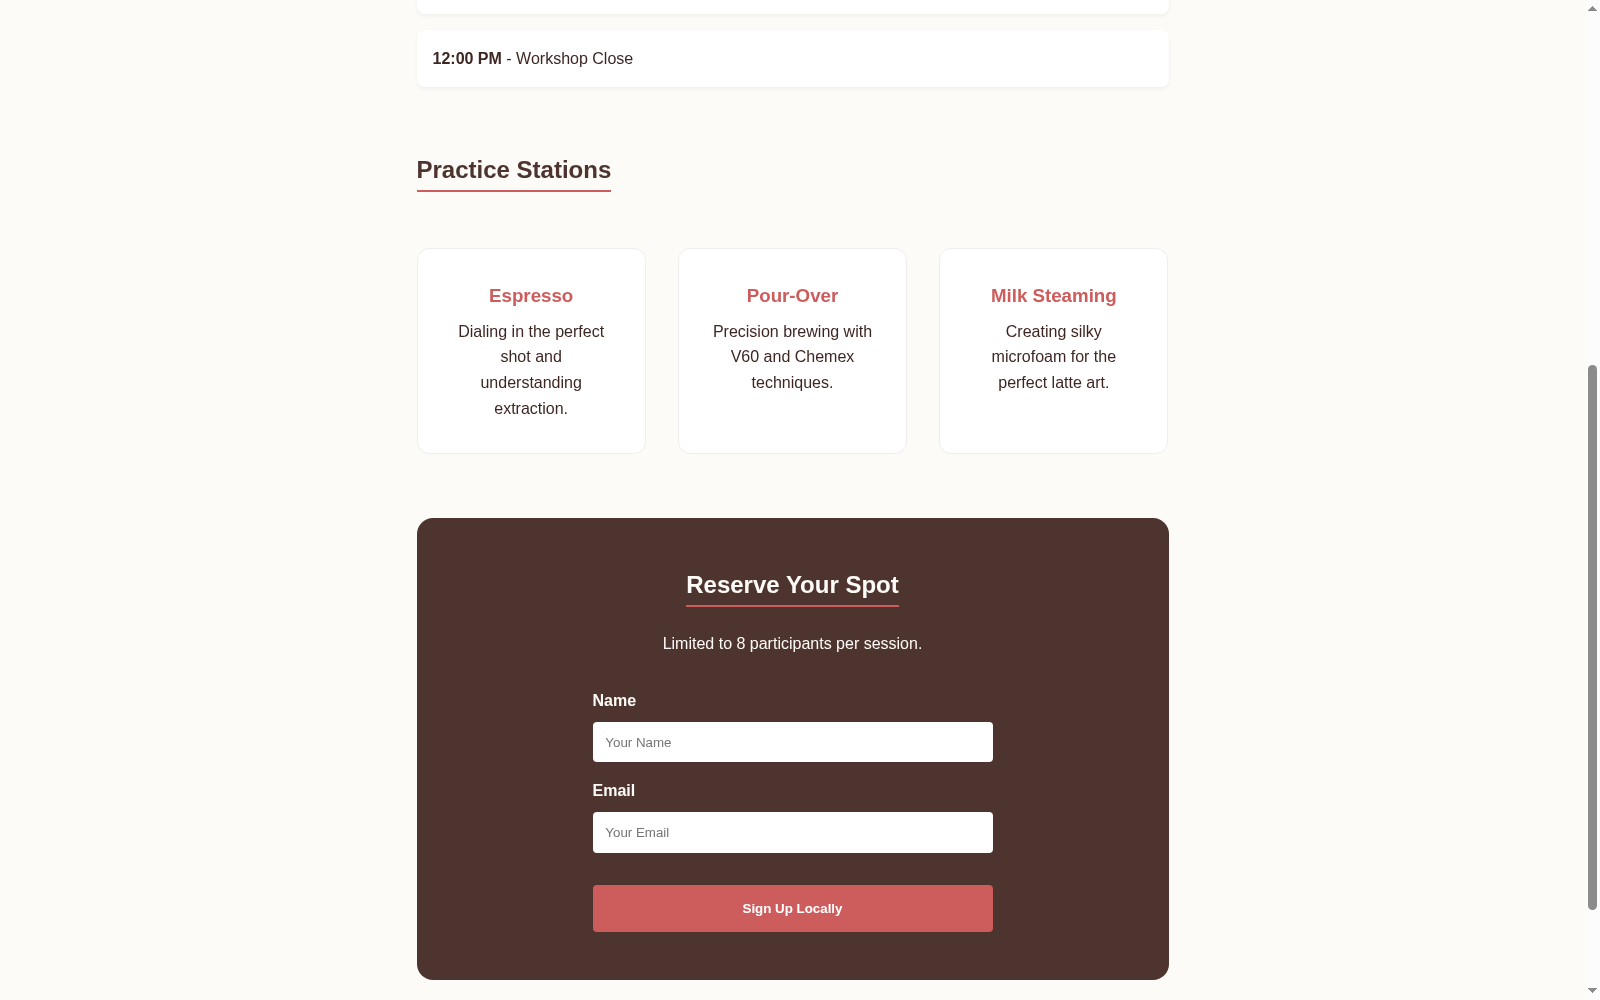
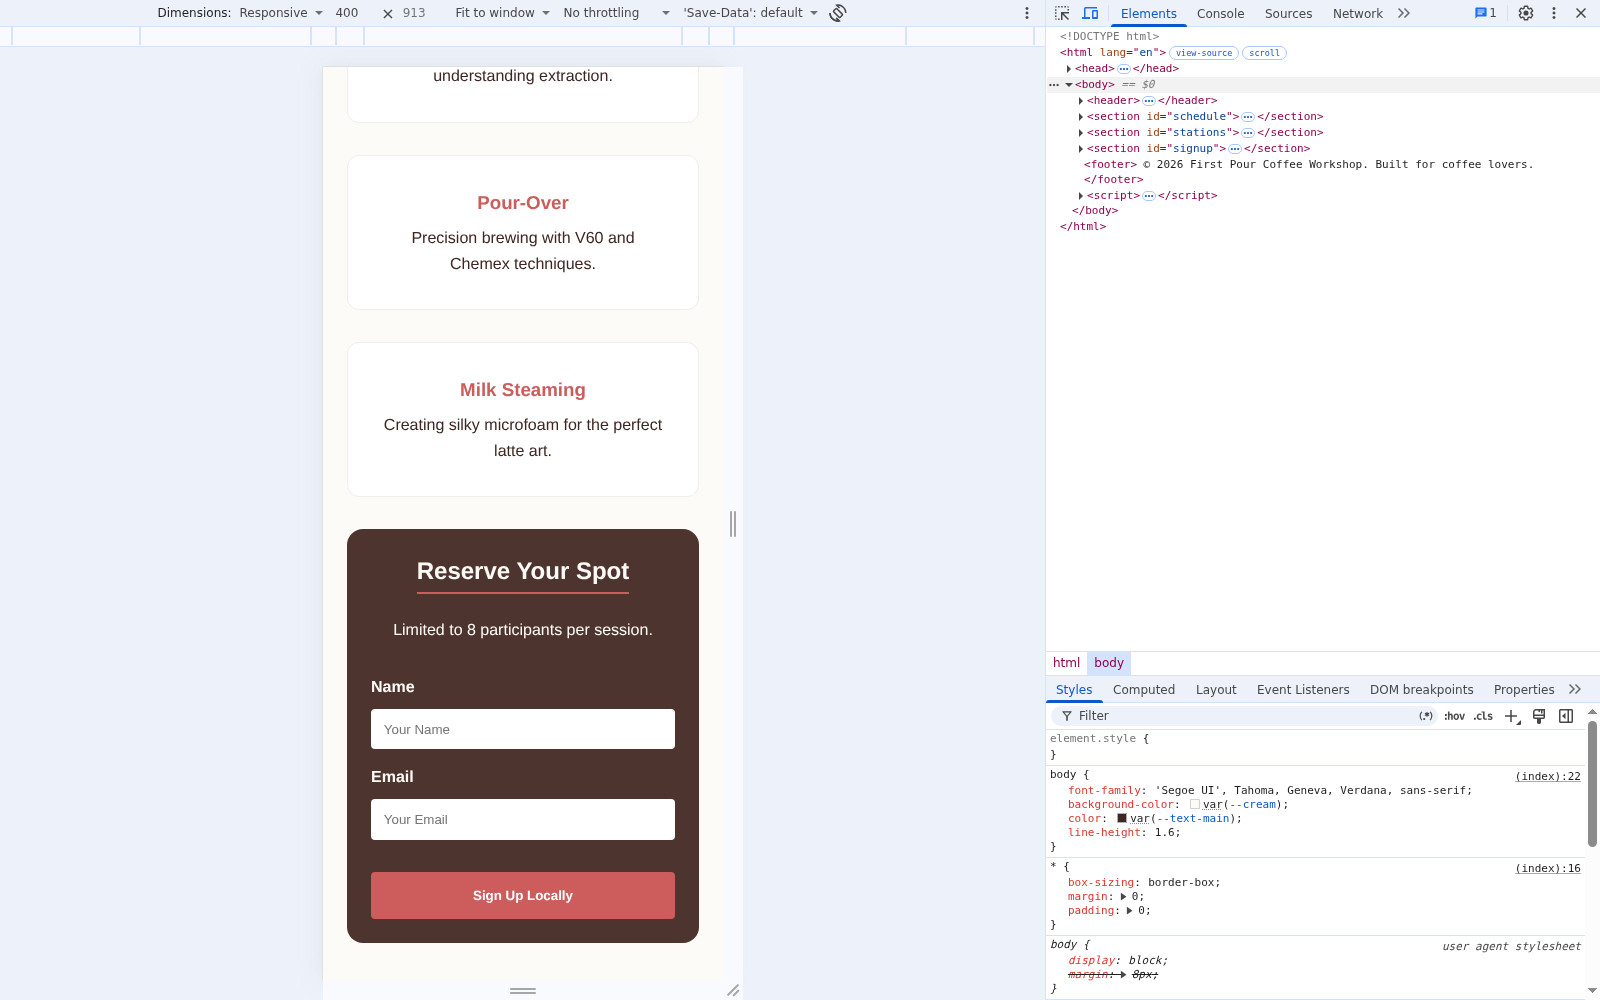
The website-build and acceptance record distinguishes the original draft, failed revision, and accepted repaired source, including its exact hash and reviewed screenshots.
Your builder is ready for another brief. Start a new chat with the same agent and describe the next website you want to make.
About this recording and its evidence
Recorded October 11, 2026, in FLUJO 3.46.2. These are real application captures operated by an agent, including the credential recovery. The existing workspace already contained agents and another model connection. Public images keep credential fields masked. The setup manifest, opening clip record, and model-test clip record identify the completed actions and their evidence.
Explore another example: read a public guide with the coffee helper, or keep a workshop plan moving with Maya.